Thursday, March 11, 2010

New Life for 2 Sad Dining Chairs...

These lovely ladies had seen better days...missing their seats, lots of scratches & scuffs...

Nothing a hand sander and a little upholstered bench seat can't fix! First, I made the scratches and scuffs appear to be on purpose (by adding more of course!) and attached a rectangular piece of plywood covered with a graphic black and cream floral. I also added a burlap pillow with a large red felt flower pin. So many possibilities with these....what a cool project! I had planned to cover the seat with burlap and do a floral pillow, but changed my mind at the last. Glad I did!

I think I will be making more benches.....sorry Dad!

(Fresh) Trash 2 Treasure

First, the maple side table....a dumpster find....! Please note, I did not actually climb in the dumpster, the tables were sitting beside it. & A friend was kind enough to point them out to me :) ! I simply sanded the tables, painted a cream color, distressed some more, and wiped an ebony stain on top! 2 Free tables....check! They are going to the school auction later this month!


And now the ugly 80's mauve lamps. Same dumpster, well just beside it. First, as you can see in picture #1 above, I sanded the lamps. I then painted them white, too boring. I then wiped an ebony stain on top of the paint, to weird. Hmmmmmm.....decoupage will cover up all my mistakes!!! I used an old dictionary purchased at the Habitat Restore for $0.50. (knew it would come in handy!) Funky shades with black and khaki stripes, perfect match. Still think the shades need a great big colorful fabric flower? What do you think???? Lamps are also headed to the auction, sure hope they find a home!

Sunday, March 7, 2010

Another auction quilt down & 1 TO GO....

So I have not posted in a while....busy quilting, refinishing furniture, and taking care of a sick child and a husband that just had surgery. (not in that order) Child is better, husband is on the mend.

But finally! The three year old class quilt is finished! The silhouettes turned out great and were super easy! Here are the steps:

1. Take a profile picture, against a white or light colored wall
2. Print the picture using black & white ink (draft mode on your printer)
3. Iron heavy duty wonder under (or similar product) to a piece of fabric large enough to hold picture.
4. Using a glue stick or double sided tape attach picture to the paper side of wonder under
5. SLOWLY cut around the picture...you are cutting through the paper, wonder under, and fabric
6. Peel off paper (picture) and wonder under. You should be left with a profile silhouette, fabric on one side, and shiny sticky material on the other
7. Place fabric shiny side down onto the bask fabric and iron! DONE!
8. Do not try to sew through the finished product...it doesn't work, trust me ;)


Sunday, February 21, 2010

More School Quilts for Auction!


Another quilt is almost complete! This is the 2 year old class quilt. I think the flowers look like lollipops, but my children assure me they look like flowers! Do you think they need leaves? I am also going to add a bird to the tree...should have done that before I added the back!

Sunday, February 14, 2010

Bringing a drawing to life!


Three days in the house with my sick little guy! We found this fun idea in a Martha Stewart Good Things for Kids Craft booklet (the kind that are available at the grocery store checkout!). My son drew his "creature" on a regular sheet of paper. I then cut around the picture leaving a 1/4 inch seam allowance. He chose his fabric and buttons from my stash & we put the hole thing together! Just needs some stuffing & we are done! Something fun to do on a cold, yucky day!

Saturday, February 13, 2010

Pillowcase Dress Tutorial ~ Doll Size

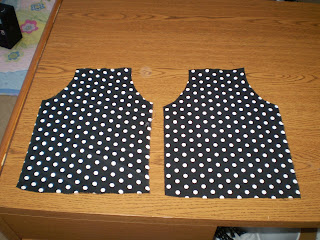
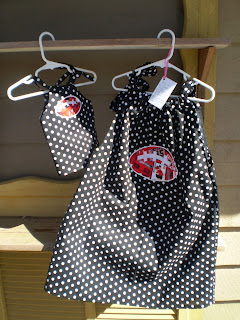
I have been working on a girl's pillowcase dress with a matching doll dress. I have looked everywhere for a tutorial on making a pillowcase dress for a doll. I was unable to find anything! So here is what I did...I folded a regular 8 1/2 x 11 sheet of paper in half lengthwise and trimmed a corner for a sleeve. I then cut two pieces from this pattern. I then followed a regular pillowcase dress pattern. Free patterns are available everywhere!

See the pictures below for the final dress & doll dress! Both are up for grabs in my ESTY shop!


Tote Bag made from an old T-Shirt

I have seen this done before & even found a few tutorials. All of the instructions I found online made a SIMPLE, 5 minute project , WAY to complicated. Most of my friends know I like quick, easy projects....that I can do in a day (or 10 minutes, really). I have no patience & can not wait to see the end result!

So here goes...

1. Find an old t-shirt
2. Cut off the sleeves
3. Cut around the neckline, a few inches from the collar (see pics)
4. Turn the entire thing inside out (or outside in if you are that kinda person)
5. Stitch 3 rows of straight stitched across the bottom, back stitching at each end
6. Stitch a row of zigzag stitches for extra stability
7. Turn right side out & YOU ARE DONE!


Monday, February 8, 2010

Planet Applique


Aren't these adorable!!!! I love this website for applique and embroidery designs! Check it out http://www.planetapplique.com . From Feb 8th to Feb 28th the new in the hoop bunny booties pattern is FREE with a $15.00 purchase! You can get a free design if you send a photo & they are having a sale on select designs...$0.99!!!!!!! Everything is so cute! & the prices are all so great! They even have a blog which has wonderful pictures and tutorials!

Saturday, February 6, 2010

Quick & Easy Valentine Project


OK, this is NOT my original idea. However, I waited to long to order online & I think these turned out just fine. We have a NO STORE BOUGHT VALENTINE rule at our house. Actually it is self imposed, I don't think my husband or kids would care. At any rate, it is tough to find something for an eight year old boy going on 14 to take to a Valentine's Day party, that won't get him decked (his words). So I created Hershey bar wrappers in Word using clip art, and word fonts. I just measured the candy bars and printed a few drafts until I got it right. A little double side tape & viola!


New Etsy Items....Just Listed!

Here is a sneak peak! I finally have some dresses made! And it actually did not rain today, so I could get some decent pictures. I plan to list the items for sale in my shop...if they don't sell they are going to auction! I love these fabrics, but felt a little silly taking pictures of spring dresses while it flurried outside! Check them out! www.etsy.com/shop/wjackson98


Saturday, January 30, 2010

School Auction - It is QUILTING time again

It is that time of year again. My children's school is preparing for the largest fundraiser of the school year. As I think I have mentioned before, my children attend a very (very, very) small private school. Along with the all of the benefits of a private education, comes the work involved to sustain a privately funded school. A few years ago we started a low country boil and auction. The auction includes a little bit of everything, trips, gift certificates, and household items. I believe that is one reason we have been so successful. The big draw for the parents is the classroom art, in our case QUILTS. The quilts, which include the student's artwork, are put together by parents.


This year the auction will include seven quilts, featuring the art of nearly 70 students! I thought this blog would be a great place to share our ideas! Let me start this post by saying that I am not a quilter, by any means. I am certain that I break every quilt "rule" known to man. No sewing circle would ever have me & I only learned to thread a needle 5 years ago! But we HAVE raised A LOT of money!

Each year our school director chooses a theme...we try to incorporate that theme in our Christmas play, parade floats, fundraising, etc. This years theme is GO GREEN. Great subject, great lesson for the kids, & so many, many ideas! I plan to post pictures of each quilt in progress and the finished projects.

The first quilt, kindergarten & first grade, is entitled "Save the Oceans". It was inspired by a project I found online. I wish I could link up to the owner, but I have no idea where I found this fantastic inspiration:

Which leads me to our version. I am working on the background "water". Sewing the curves has proved to be a little harder than I thought! I found a very user friendly tutorial at http://www.equilters.com/. ( Here is the link http://www.straw.com/equilters/library/techniques/sewing_curves.html) And now our work in process !


The children have made sea creatures, sharks, jellyfish, dolphins, using a glue batik method found at http://www.familyfun.com/ to create their artwork. (Here is the link http://familyfun.go.com/crafts/glue-batik-banner-785331/ ) I'll be sure to post some more pictures when we are finished!

Off to the sewing machine to work on another.....

Sunday, January 24, 2010

Funky Side Table

Thought I would share this fun project I finished a few months ago. This whimsical little table needs a home, just not mine. I loved making it, just not sure where to put it! I originally purchased the table base with hopes of using it for a night stand in my daughter's room. But (sigh) I did not measure & it was way to big! My partner in crime found this great clock...hmmmmm. I removed the clock parts and attached the table to the base. I also added black stain to tone the yellow down a bit. Not sure why I thought a table with a clock on top needed to be toned down, but what the hey. I don't think the clock face would withstand the elements, or this baby would be on the porch! Isn't it fun?


Sweet Scarf

I think the rain has finally ended in GA, the kids are sleeping, and the washing machine is humming...perhaps I can finally get a few things done? I don't feel like a got much accomplished this weekend. I did, however, finish a sweet little scarf using left over Amy Butler fabric from a charm square pack. I used most of the squares to make a darling skirt, which my sweet girl refuses to wear! #$%^&@


Onto the scarf. The back of the scarf is remnants of a chenille bedspread that was slowly falling apart. (The remainder of the bedspread was turned into pillows!) I simply sewed a length of the squares together, added pom-pom fringe scraps, cut a length of chenille for the back, sewed right sides together leaving a hole for turning...and there you have it! Upon completion, I realized that white may not have been the best choice for a scarf. I am certain, that if Maggie ever decides to wear it, it will become a giant napkin? Oh well, it looks good on my porch post ;) !


Tuesday, January 19, 2010

Updated Blog & Etsy Store

I just got a new blog banner, Etsy store banner & avatar, and business cards! Everything "goes". I am so excited! I read a lot of blogs and I am always so impressed with the photos/graphics/creativity. I am a blog NEWBIE....so all of this is extremely foreign to me, but I am learning!

How did I accomplish this amazing task you ask? Well I did not! I simply placed an alchemy request on Etsy & received a lot of bids. Ultimately I chose a really great store with tons of cool invitations, business cards, etc., etc., etc. Really great price, easy to work with, and very, very fast! Can't beat that! Here is the link to her shop: http://http//www.etsy.com/shop/Deidamiah I am very pleased with my order...check it out!

I guess all of this good news means I need to get back to my sewing machine and get some items on the shelves of my Etsy store! I cleaned everything out after Thanksgiving & Christmas...time to get sewing!

Sunday, January 17, 2010

Kitchen Cabinets

If you happened to read the last post, the felted wool purse was hopeless. My daughter is now using it to cart around the cat. Not sure if the cat or I are very happy, but my girl is...!


Onto this post, my cabinets. Once upon a time they were a VERY ugly "mapley" color, with a darker stain in the routed out bit. The wallpaper back splash was white with yellow flowers! Antique brass hardware and light fixtures. UGLY!


Well I had to redo on a budget & something I could do on my own. New wallpaper backsplash in tan and hunter green check, new light fixtures in antique rubbed bronze, and new cabinet hardware did the trick. That & the paint job!


Here is what I did:

*Sanded and cleaned all of the doors, drawers, and surrounds
*Let my kiddos go wild with chains, and a meat tenderizer (probably wasn't one of my better ideas)
*Gave each 2 coats of a cranberry/red paint (the cabinets, not the kids)
*Sanded, distressed, and cleaned again
*Rubbed, splattered, and dry brushed black stain on top of the red paint
*2 coats of poly


I probably spent $300 on the entire project. Not the choices I would have made with $15K, but hands down better than the before!


Sunday, January 3, 2010

MY OOOPS Felted Wool Purse

So I went to a craft show & saw the cutest felted wool purse. But I had a cheap moment and said to myself, "I can do that!, There is no way I am paying $20 for that!" The original purse was not lined and was very flimsy. So I decided to line mine and add iron on stabilizer to the lining material. I also added denim from an old pair of jeans to the handle for stability.

Well, I am here to tell you that purse was probably well worth every penny!!! I tried to make my own. What a mess!!! I have read that all you do is wash the wool item, sweater in this case, in the hottest water possible & dry on high heat. Perhaps I bought the wrong kind of wool sweater? I had lint EVERYWHERE!!! Tons of it, what a mess!

Anyway , the "felting" part worked even though it was messy. The material was easy to cut, did not fray, & was easy to sew. I think the flower turned out cute. I'm not sure what I did wrong on the rest of the purse...the top is curling...it may because I top stitched around the opening of the bag to close the hole I left to turn the bag? Perhaps I should have hand stitched the opening? I have the bag lying under a stack of books for the evening, maybe it will look better in the morning?